

Prerequisite
This guide suppose you already have a physical Scaleway dedibox server installed with a hypervisor distribution (Vmware ESXi 6.5 in my case)
It also suppose you already have a virtual machine installed with Ubuntu 20.04 running on your hypervisor but reachable only through IPV4
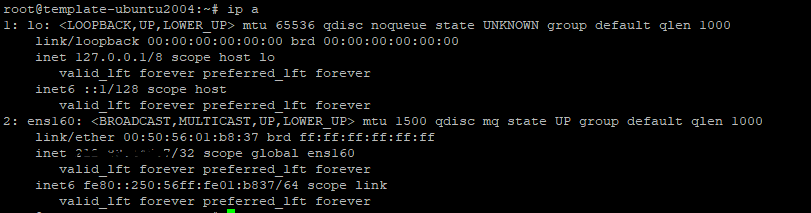
At minima, the command ip a run on your virtual machine should give you something like this
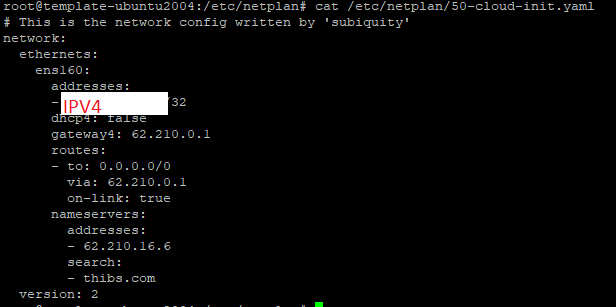
The file /etc/netplan/01-netcfg.yaml (or any netplan file you are using) should look like this
Activating SLAAC on your hypervisor
On https://console.online.net/, choose « Server » from the menu

From the list of servers, choose the physical server hosting your virtual machine by clicking « manage » on the right side
On central menu, click on « Activate IPV6 SLAAC »
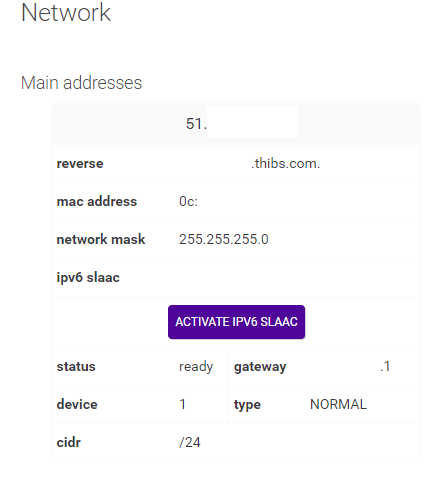
When this process is done, your hypervisor will respond on the displayed IPV6 address
This process is also described in https://www.scaleway.com/en/docs/dedibox-network/ipv6/how-to/enable-ipv6-slaac/
Request IPV6 prefix
Then you have to request IPV6 prefix as described into
https://www.scaleway.com/en/docs/dedibox-network/ipv6/how-to/request-prefix/
Install configure DHCP client
Then you have to install/configure dhcp client on your virtual machine as explained in
https://www.scaleway.com/en/docs/dedibox-network/ipv6/how-to/configure-dhcpv6/
Don’t forget:
- To specify the DUID linked to your IPV6 range in /etc/dhcp/dhclient6.conf
- To enable the DHCP client service
At the end of this configuration, you should be able to start he service by running
systemctl start dhclient.service
This could be checked with command
systemctl status dhclient.service

If the service isn’t running and if you are unable to make it start, it’s probably because your local ufw firewall is blocking it.
You could allow it thanks to this command
ufw allow from any port 547 to any port 546 proto udp
At this step the command ip a should give you something like this (only non-routed local IPV6)

Edit your used netplan file (probably /etc/netplan/01-netcfg.yaml) to add one of the free IPV6 from your range + the instruction dhcp6: false
  addresses:
  - IPV4/32
  - IPV6/64
...
   dhcp6: false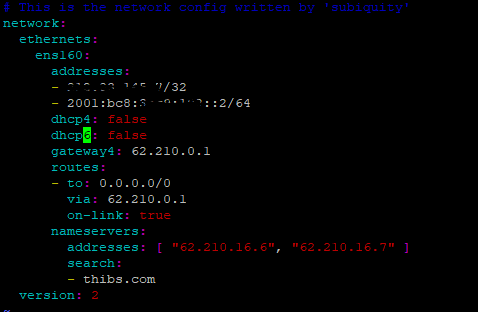
Apply your new config with command netplan apply
If you get this warning message, just ignore it

Unfortunately, your IPV6 is still not routed at this step
Launch the command ip a
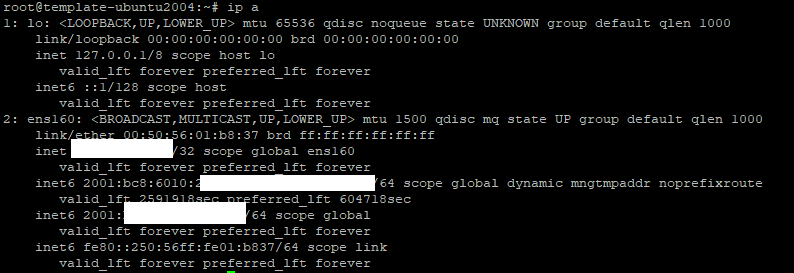
You could see
- The first inet corresponding to your IPV4
- The first inet6 with an IP very similar to the IPV6 your hypervisor has receiveid through SLAAC
- The second inet6 corresponding to the IPV6 you’ve just specified in your netplan file
- The third inet6 corresponding to a non-routed local IPV6
Edit once again your netplan config to add the non-routed local IPV6 you have just seen
gateway6: non-routed local IPV6
And under routes
  - to: "::/0"
    via: "non-routed local IPV6"
    on-link: true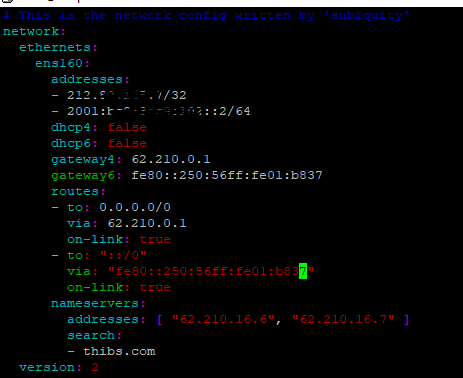
Apply once again your change with command netplan apply
Unfortunately, your IPV6 is still not routed at this step BUT you should be able to discover the correct gateway
Launch the command ip -6 route and take note of the displayed correct gateway

Edit for the last time your netplan config to add this gateway where your non-routed local IPV6 was specified
 gateway6: correct gateway
 - to: "::/0"
    via: "correct gateway"
    on-link: true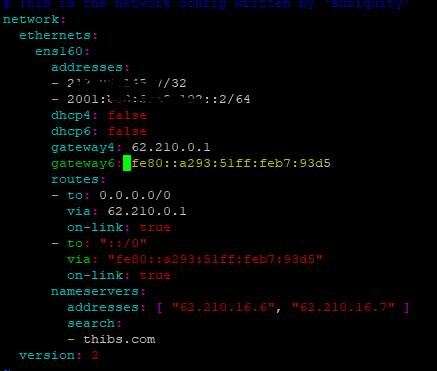
For the last time apply your change with command netplan apply
And test your virtual machine could access external IPV6 with command ping6 ipv6.google.com

(CTRL+C to stop)
Check your IPV6 is reachable from Internet by using an external tool like http://www.ipv6now.com.au/pingme.php
Autre guide plus ancien http://wiki.csnu.org/index.php/Ipv6_online.net_et_routage et https://www.mistergeek.net/internet/ipv6-serveur-scaleway-dedibox/
Tips do to it with Proxmox server
1° On Proxmox server, add following line into /etc/sysctl.conf
net.ipv6.conf.vmbr0.autoconf = 0
net.ipv6.conf.vmbr0.accept_ra = 2
net.ipv6.conf.default.forwarding = 1
net.ipv6.conf.all.forwarding = 1
net.ipv6.conf.default.proxy_ndp = 1
net.ipv6.conf.all.proxy_ndp = 1
2° On Proxmox server modify /etc/modprobe.d/local.conf
options ipv6 disable=0
3° On your VM, identify the gateway with command
ip -6 route
4° If SLAAC is activate for your Proxmox server, add following line in your netplan config
accept-ra: no
(same identation as « addresses »)
e.g. :
network:
ethernets:
ens18:
addresses:
– XXX.XXX.XXX.XXX/32
– 2001:XXXX:XXXX:XXXX::X/64
dhcp4: false
dhcp6: false
routes:
– to: 0.0.0.0/0
via: 62.210.0.1
on-link: true
– to: « ::/0 »
via: « fe80::XXXX:XXXX:XXXX:XXXX »
on-link: true
accept-ra: no
nameservers:
addresses:
– 62.210.16.6
– 62.210.16.7
search:
– thibs.com
version: 2
fe80::XXXX:XXXX:XXXX:XXXX is the gateway found with ip -6 route
2001:XXXX:XXXX:XXXX::X/64 is your IPV6 address